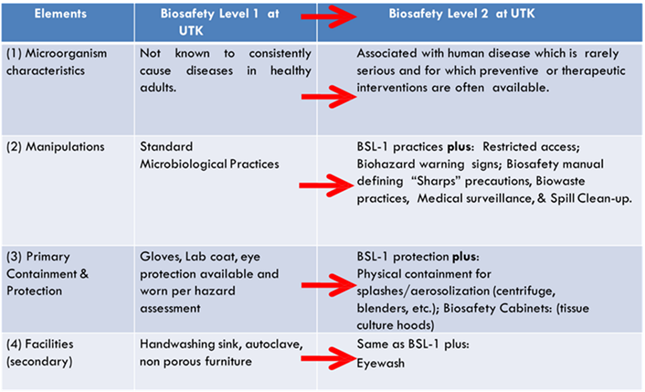
This module covers the laboratory practices and procedures associated with Biosafety Levels 1 & 2. To summarize:
Biosafety Level-1 represents a basic level of containment that relies on standard microbiological practices with no special primary or secondary barriers recommended, other than a sink for hand washing. BSL-1 practices, safety equipment, and facility design and construction are appropriate for most undergraduate and secondary educational training and teaching laboratories, and for other laboratories in which work is done with defined and well-characterized strains of viable microorganisms not known to consistently cause disease in healthy adult humans or negatively impact the environment. However, many agents not ordinarily associated with disease processes in humans can be opportunistic pathogens and may cause infection in the young, the aged, and immunodeficient or immunosuppressed individuals. Additionally, vaccine strains that have undergone multiple in vivo passages should not be considered avirulent.
Examples of agents that can be worked with at BSL-1 include Bacillus subtilis, Saccharomyces cerevisiae (baker’s yeast), adeno-associated virus (AAV), most E. coli strains used for cloning/molecular biology (e.g. DH5a, DH10B), and many environmental microorganisms.
Biosafety Level-2 containment and safety practices are suitable for work with a broad spectrum of indigenous moderate-risk agents that typically cause mild-to-moderate human disease. Additionally, BSL-2 is usually the default biosafety level when working with diagnostic specimens from humans and/or animals.
Examples of agents that can be worked with at BSL-2 include hepatitis A virus, herpes simplex virus, Toxoplasma gondii, Staphylococcus aureus, Streptococcus pyogenes, Salmonella species and many other foodborne pathogens. Additionally, human and nonhuman primate specimens can typically be manipulated using BSL-2 practices and containment. Finally, BSL-2 practices are often employed while handling acute biological toxins.
BSL-1 vs. BSL-2 considerations are summarized below. With elevated risk, comes elevated containment.
3.1 STANDARD MICROBIOLOGICAL PRACTICES
The foundation of each biosafety level is standard microbiological practices (SMP). BSL-1 labs employ SMP as the baseline criteria for biological safety & containment. Subsequent BSLs build upon SMP with more specialized design, equipment, and practices.
- Restricting access to laboratories using biological hazards per the BMBL and the UTK laboratory security policy. The PI is ultimately responsible for restricting access to approved personnel or visitors.
- Hand washing after handling biologicals and potentially hazardous materials, after taking off gloves and before leaving the lab.
- Avoiding hand-to-face (or mouth) contact. No eating, drinking, smoking, or applying cosmetics in the lab.
- Disinfecting work surfaces daily and decontaminating after spills.
- Prudent handling, management, and disposal of sharps.
- Using procedures that minimize the formation of aerosols and splashes; engineering controls for aerosol release may be required.
- Wearing appropriate personal protective equipment (PPE), e.g., lab coats, gloves, safety glasses, safety goggles, etc.
- Using primary and secondary containment when transporting materials.
- Disposal of all non-sharps solid biological waste in a proper container lined with an autoclavable bag for disposal. Liquid biological waste must be disinfected or autoclaved before sink disposal.
Other SMP to be used in laboratories handling biological materials include:
- Keeping personal items such as cell phones or tablets outside of the work area
- Disallowing outside pets, plants, or other personal effects/decorations from the work area
- Minimizing exposed skin, and thoroughly covering broken or abraded skin or skin with rashes
- Avoiding open toed shoes, sandals, flip flops or any footwear with exposed skin or holes while working in the laboratory
- Knowing the risks of lab activities and don the appropriate PPE
- Restraining long hair when operating equipment with exposed moving components or when working with chemicals or biologicals
- Providing information regarding changes to health status that could impact their health and safety in the research environment.
Biosafety Level 2 practices (BSL-2) consist of SMP plus:
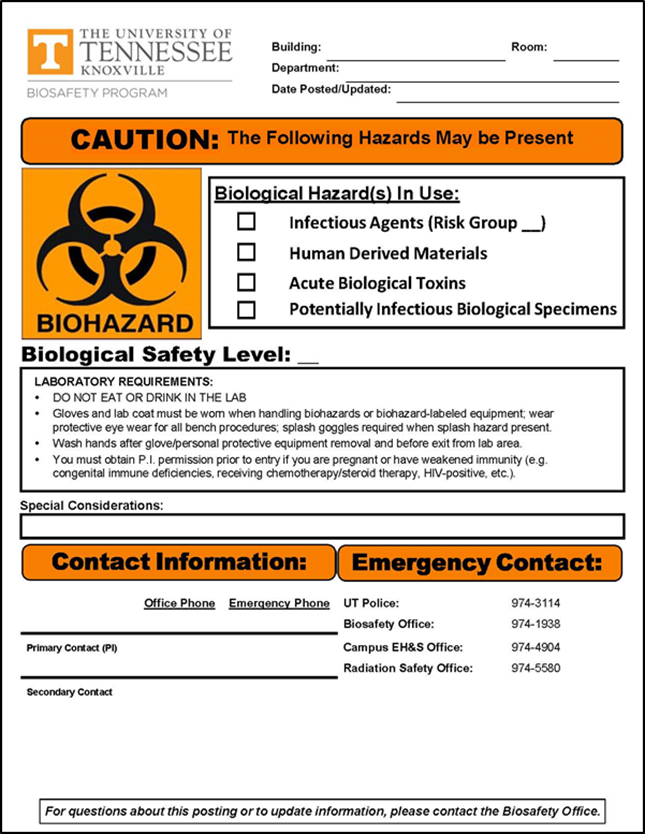
- Hazard communication through door signs/placards and biohazard labelling
- More stringent PPE requirements, typically gloves, long-sleeved lab coat/smock, and protective eyewear.
- Aerosol control and containment
- Enhanced engineering controls:
- Biological safety cabinets
- Emergency eyewashes
- Integrated pest management program
- Medical surveillance programs as indicated by risk assessment
3.2 HAZARD COMMUNICATION
BSL-2 (& BSL-3) labs can be easily differentiated from BSL-1 labs in that the outer doors of areas where biological hazards are manipulated feature cautionary placards. The Biosafety Program-approved placard is exampled here.
Placards are available by contacting EHS Lab Safety Services at 865-974-5084.
At UTK, the universal biohazard symbol and the word “BIOHAZARD” are used to indicate higher risk areas where there is a risk to human health. Therefore, BSL-2 door placards feature the universal biohazard symbol which alerts lab workers, visitors, maintenance & housekeeping personnel, vendors, and others who may need to enter the laboratory.
Placards also communicate entry considerations, e.g.:
- Entry requirements such as PI authorization;
- Health: immunocompromised individuals are advised of the increased risk and an individual risk- assessment can be conducted for these individuals; vaccine requirements may also be posted;
- Practices: PPE requirements & SMP highlights
- Doors should be kept closed during experiments when BSL-2 agents are in use.
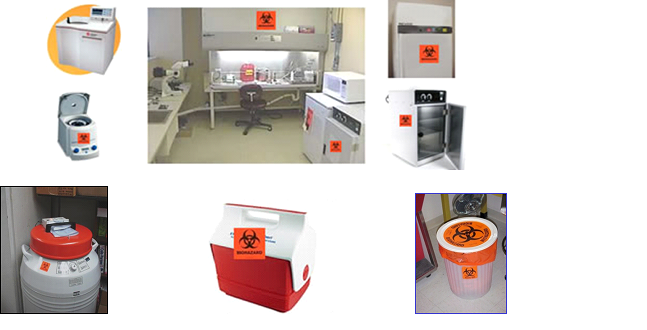
Equipment used to process or store biohazards that may impact human health must be labeled with the universal biohazard symbol. For example, hoods, freezers, incubators, and centrifuges, etc. are labeled if they are used with risk group 2 (RG2) agents or higher. Also, transport containers and biohazard waste containers must display a biohazard label on the outermost part.
3.3 HANDWASHING
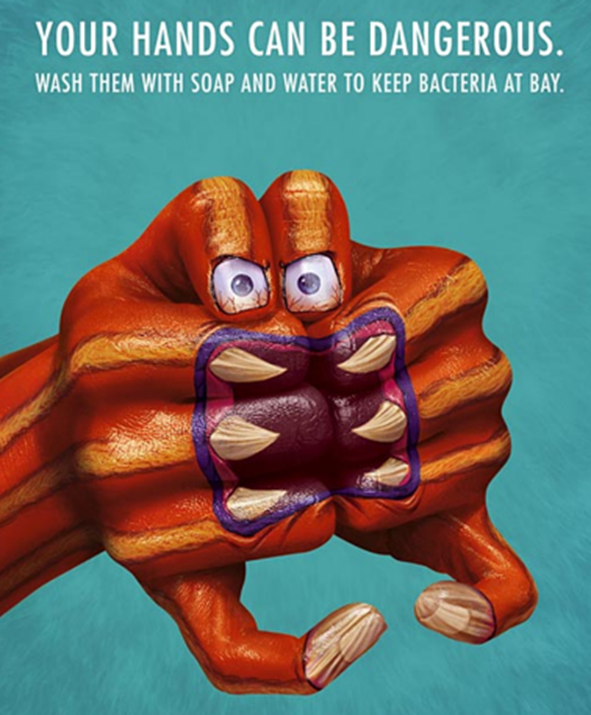
One of the simplest measures you can take to protect yourself (and others) inside and outside of the laboratory is washing your hands. This simple procedure has been thoroughly demonstrated to be the primary means of infection and contamination control in laboratory and clinical settings. In other words, hand washing is extremely important in preventing lab acquired infections (LAIs) and minimizing the spread of infectious materials.
Upon entering the lab, you should familiarize yourself with critical lab infrastructure and where it is located: fire alarms/extinguishers, emergency shower, first-aid kits, emergency eyewash stations and hand washing sinks.
Hands must be washed:
- Anytime they may have become contaminated with infection-risk material
- After glove removal
- Before leaving the work area
Procedure:
- Use cold-to-tepid water and soap (does not need to be antibacterial)
- Lather for 20-30 seconds, paying attention to palms, backs of hands, finger webbing, cuticle beds, and wrists
- Rinse and dry. Use paper towel to turn off water faucet drying your hands.
Hand Hygiene – A word about hand sanitizers:
In case of limited access to soap and water (e.g. field procedures), waterless hand sanitizers may be used as a temporary means of reducing contamination until a source of running water and soap can be reached. However, because of the variety of products available and organisms used in UT labs, EHS Lab Safety Services cannot adequately validate waterless hand sanitizers for efficacy in all cases. Therefore, these products are NOT a replacement for hand washing with soap and water and should not be used as such.
When using a waterless sanitizer:
- Ensure that the active ingredients include > 60% alcohol (ethanol or isopropanol)
- Apply quantity recommended by manufacturer
- Thoroughly distribute as if you were washing your hands (paying attention to palms, backs of hands, finger webbing, cuticle beds, and wrists)
- Rub until completely dry
- Wash your hands with soap and water (as described on previous slide) once available.
3.4 EMERGENCY EYEWASHES
Eyewashes are required for labs operating a BSL-2, though they are often found in BSL-1 labs as well. Eyewashes must be maintained in good working order and flushed according to the EHS requirements for general lab hygiene, generally weekly. The eyewash is in place for your protection. Weekly flushes keep sediment and bacteria from accumulating in the lines which could potentially cause harm to your eyes in case of emergency use.
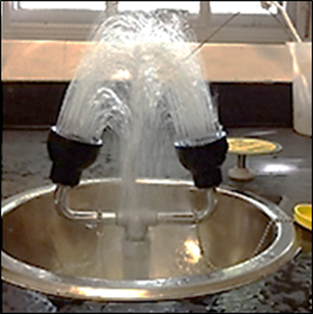 The following items are important to know for eyewash care/use:
- A functional eyewash should project streams of clear, tepid water at a pressure that is strong and even enough to easily reach the eyes of the user in a way that is comfortable enough for the user the maintain hands-free flushing for 15 minutes.
- Handles should be clear of obstruction and located so that they are easily found.
- The interface between the spray-head and the cap should be cleaned routinely with 70% ethanol or isopropanol.
- If the pressure isn’t high enough to remove the protective caps without manual intervention, particulates are present in the stream, or the water is discolored, then the eyewash isn’t working properly. Contact EHS or Facilities Services if the eyewash isn’t functioning.
3.5 ELIMINATE ROUTES OF ENTRY
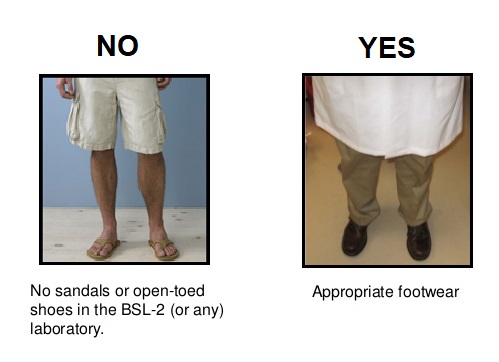 Proper attire is a prudent practice in any research laboratory, including those where biological materials are handled. Prior to working in the laboratory, ensure that you are wearing clothing that covers exposed skin and close toed shoes made of substantial, non-porous materials. Proper attire minimizes potential routes of entry, and is particularly important at BSL-2.
What is personal protective equipment?
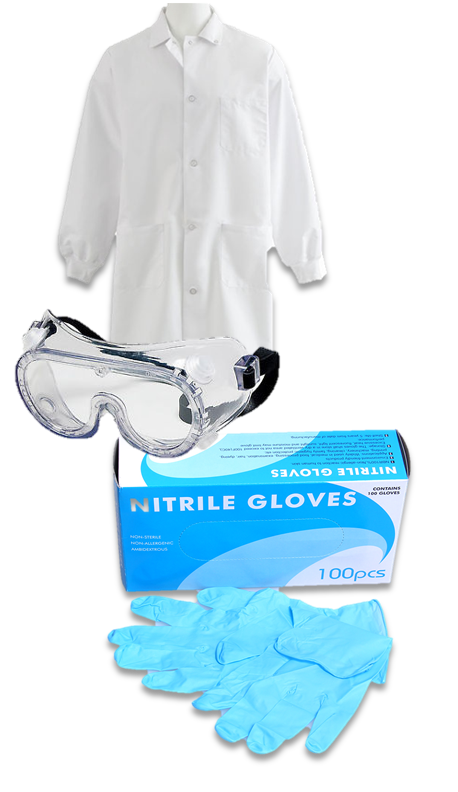
Personal protective equipment, commonly referred to as “PPE”, is equipment worn to minimize exposure to hazards that cause serious workplace injuries and illnesses. These injuries and illnesses may result from contact with biological, chemical, radiological, physical, electrical, mechanical, or other workplace hazards. Personal protective equipment may include items such as gloves, safety glasses, chemical splash goggles, lab coats, and respiratory protection.
What can be done to ensure proper use of personal protective equipment?
 All personal protective equipment should be safely designed and constructed, and should be maintained in a clean and reliable fashion. It should fit comfortably, encouraging worker use. If the personal protective equipment does not fit properly, it can make the difference between being safely covered or dangerously exposed. When engineering, work practice, and administrative controls are not feasible or do not provide sufficient protection, employers (e.g. PI or lab supervisor) must provide personal protective equipment to their workers and ensure its proper use.
Employers are also required to train each worker required to use personal protective equipment to know:
- When it is necessary
- What kind is necessary
- How to properly put it on, adjust, wear and take it off
- The limitations of the equipment
- Proper care, maintenance, useful life, and disposal of the equipment
Gloves
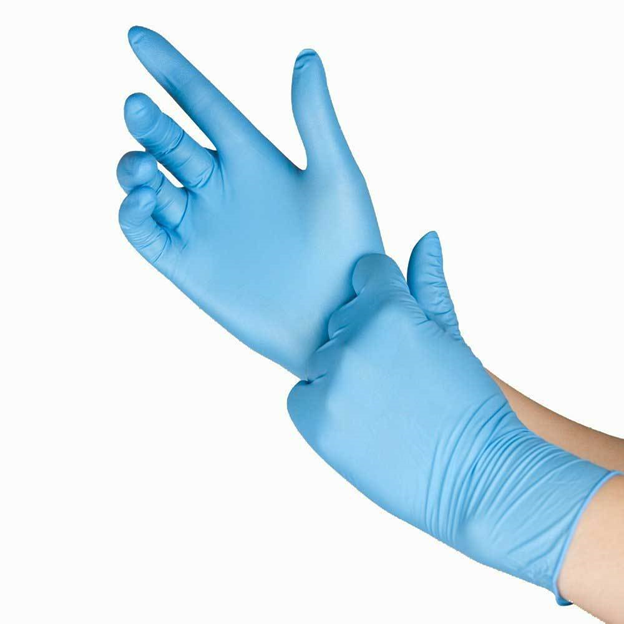 Gloves are required for all manipulations of RG2 organisms unless alternative protection is established in an SOP.
Gloves must be:
- Fluid resistant (a non-latex material, e.g. nitrile, must be available)
- Powder-free
- Disposable – do not reuse gloves unless they are utility gloves that are intended to be reused; dispose when compromised
- Free of defects, tears, or breaks
- The right size for your hands
- Removed before leaving the lab, touching phones, doorknobs, or other common contact surfaces or objects (fomites, see below)
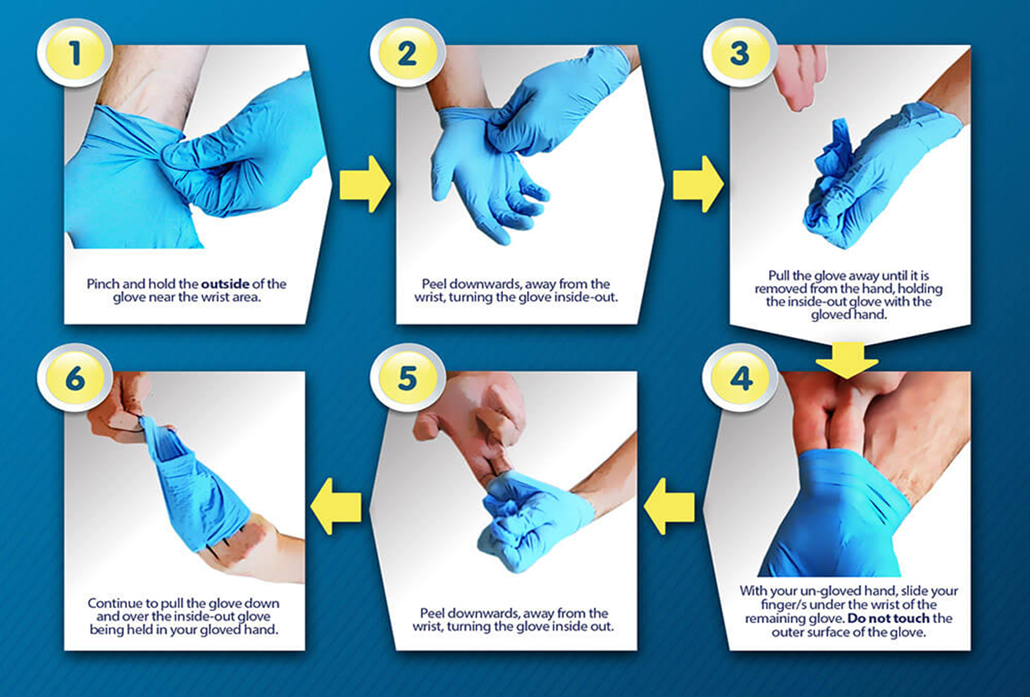
Donning & Doffing Gloves
Lab coats
Protective lab coats are recommended to prevent contamination of personal clothing at BSL-1. At BSL-2, they must be worn when working with hazardous materials.


Lab coats must be:
- Long sleeved – preferably with a gathered cuff
- Removed before leaving for non-laboratory areas
- Laundered appropriately – lab coats must be laundered routinely and when contaminated. Lab coats should never be cleaned in personal or public washers and dryers. See the Biosafety web page for more information regarding proper laundering of lab coats
Eye Protection
Wear protective eye wear when conducting procedures that have the potential to create splashes of microorganisms or other hazardous materials.

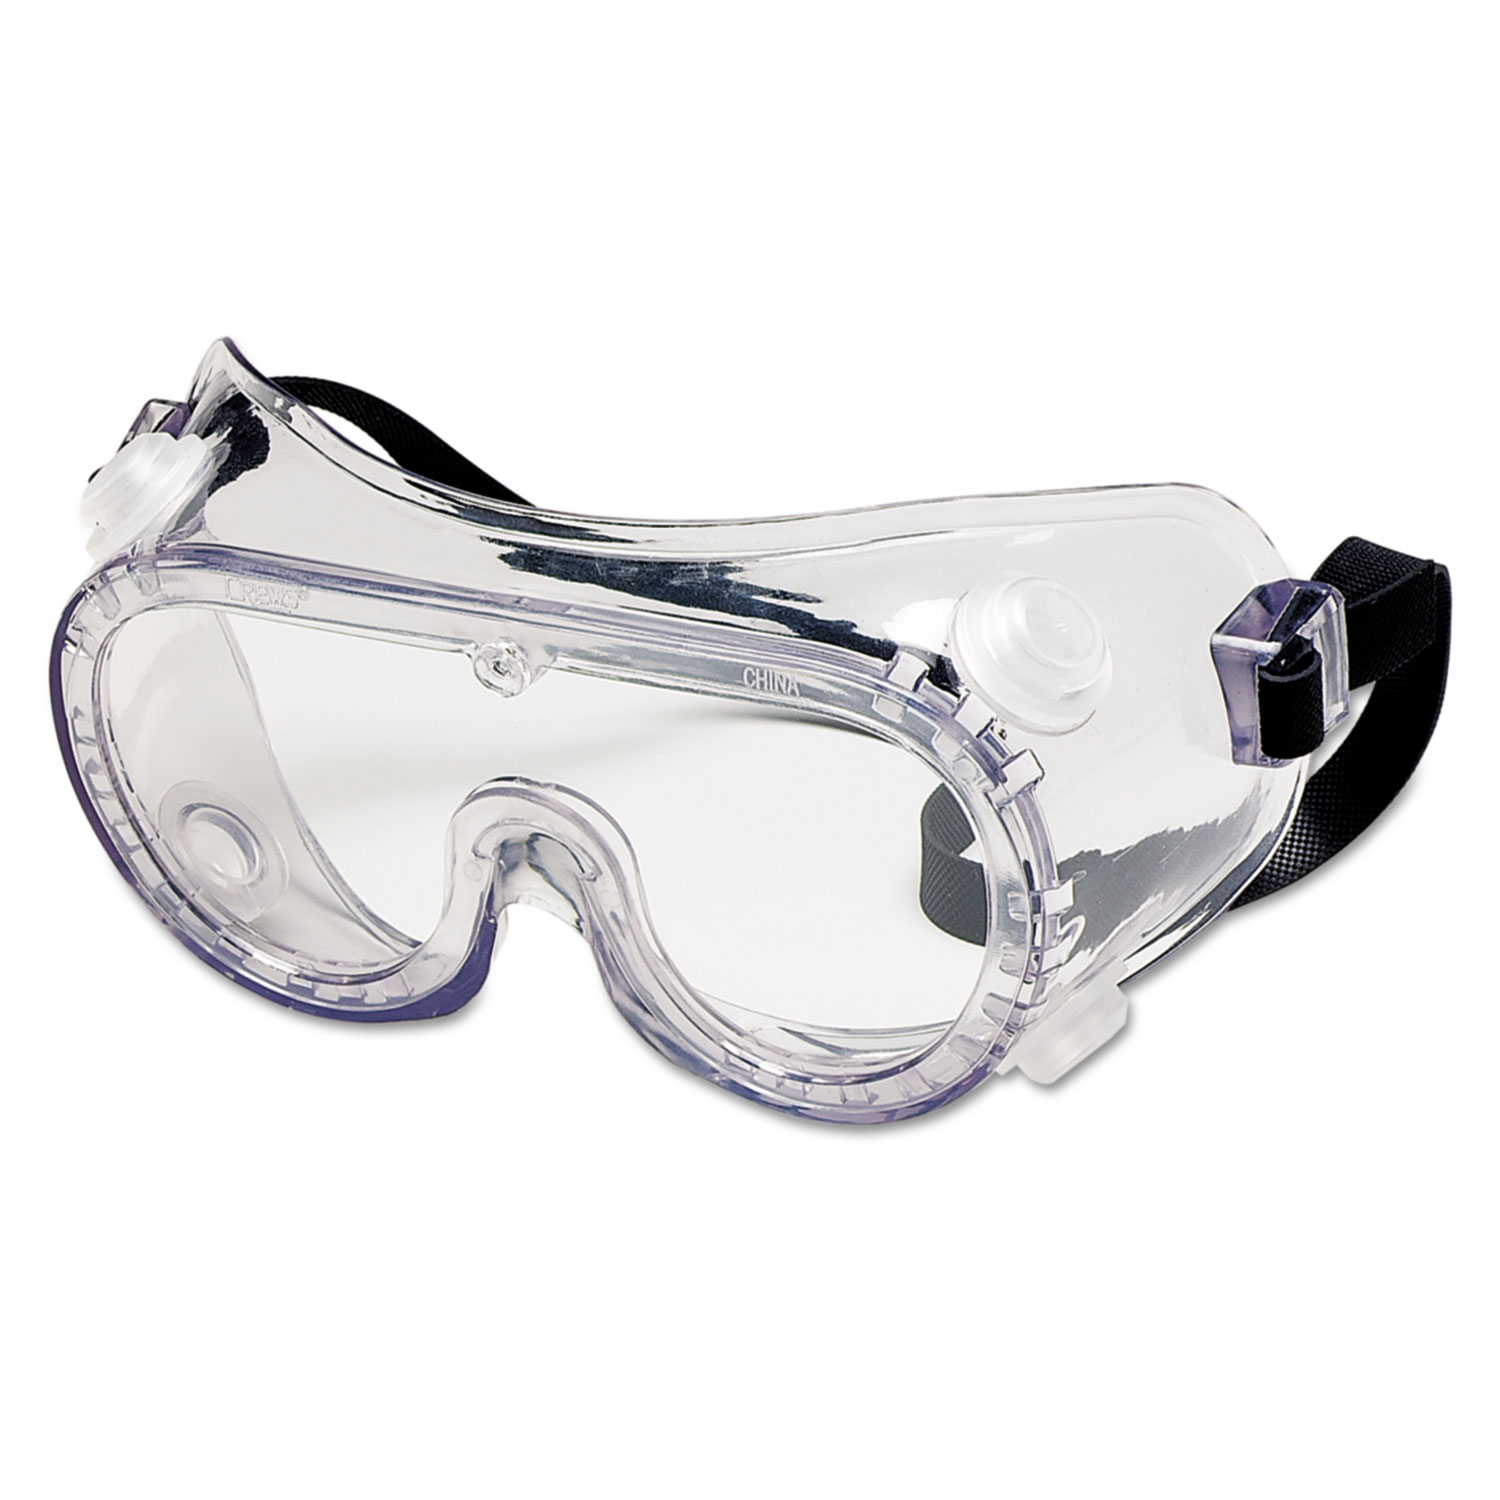
Eye protection must be:
- Worn according to the laboratory hazard assessment
- Cleaned, stored, and replaced – according to manufacturer’s recommendations and prudent laboratory practices
- Appropriate for the task:
- Safety glasses with side shields must be worn when there is a risk of particulate projectiles (broken glass shards)
- Indirectly vented chemical splash goggles must be worn when there is a risk of aerosols, splashes, sprays, or splatters of infectious or hazardous liquid material coming into contact with the eyes or the tissues surrounding the eyes (bleach, liquid cultures, etc.)
Face Protection
 Face protection must be used if splashes or sprays of infectious or other hazardous materials are anticipated.
Face protection must be:
- Worn according to the laboratory hazard assessment
- Cleaned, stored, and replaced – according to the manufacturer’s recommendations and prudent laboratory practices
- Appropriate for the task:
- UV exposure requires a specially rated type of material for the face shield
- Liquid exposure requires protection against potential splashes or sprays of infectious or hazardous liquid
Respiratory Protection
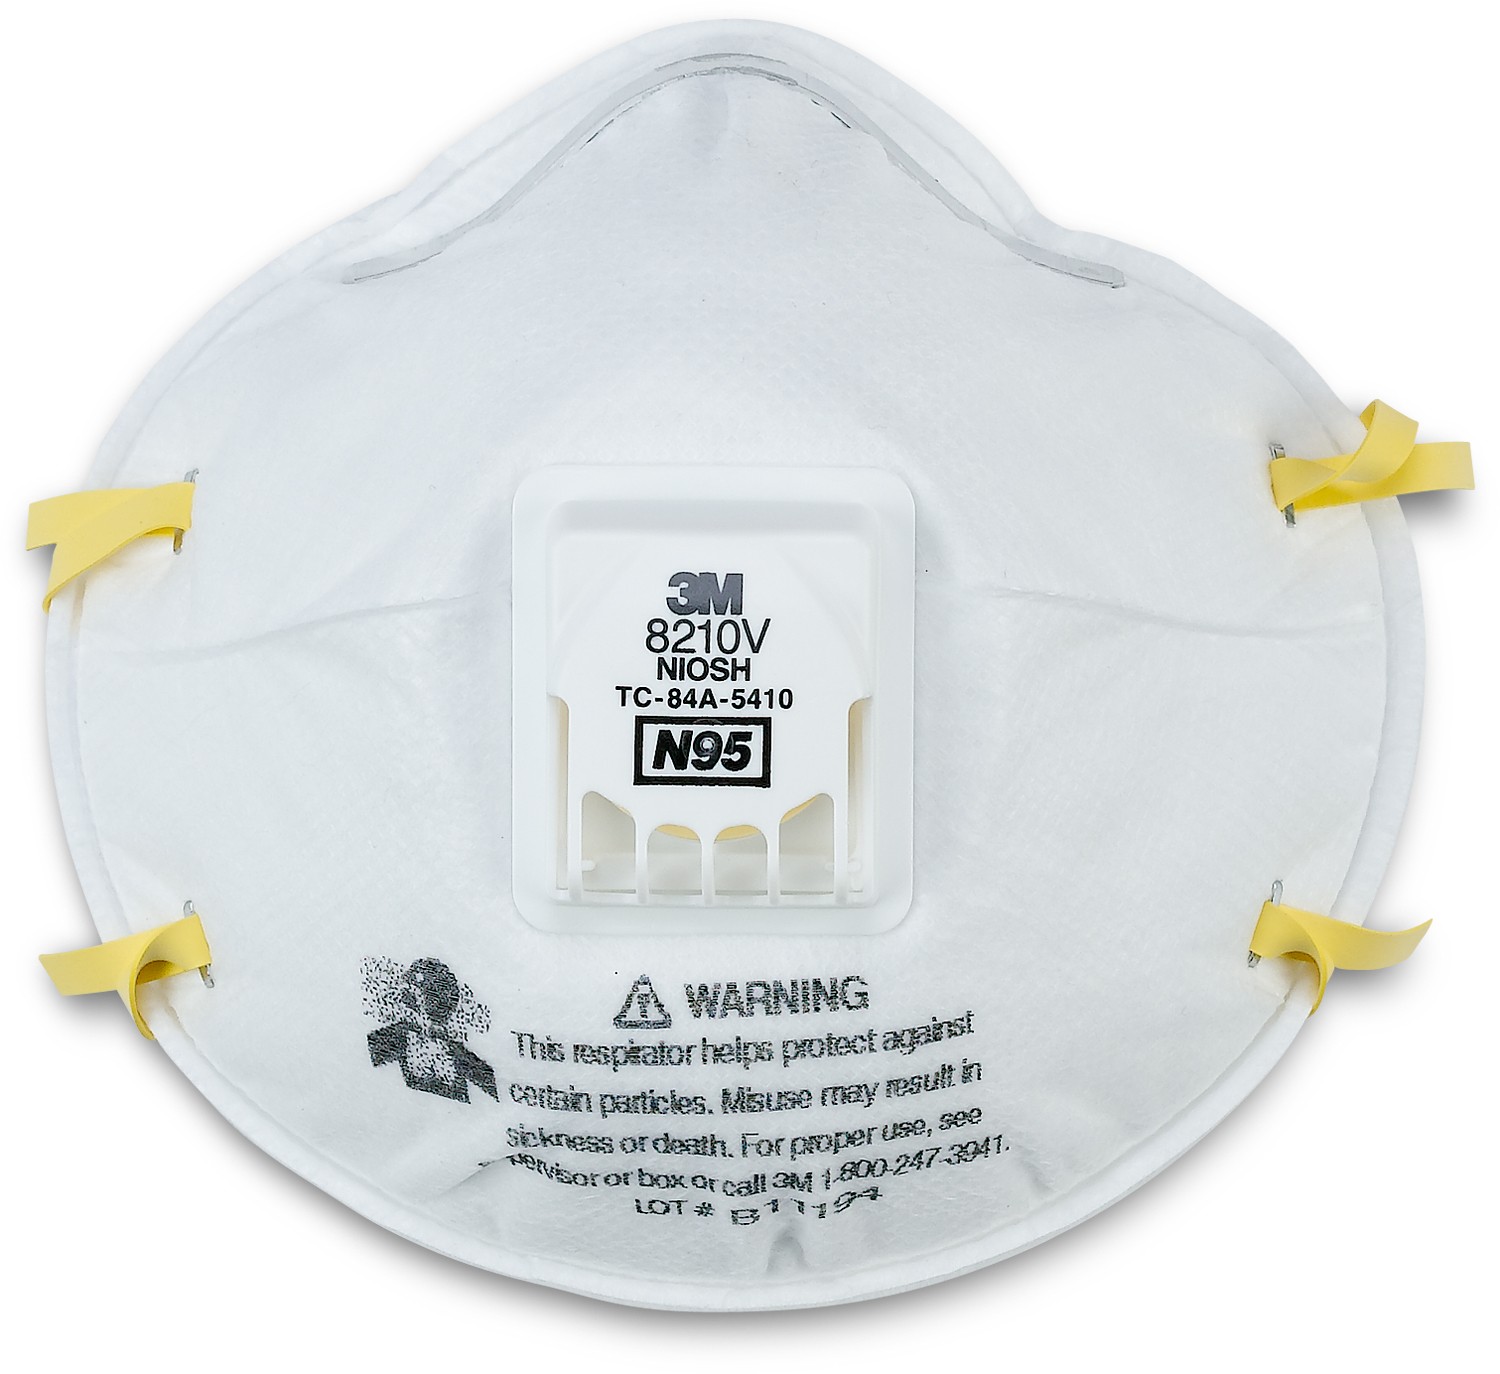 Additional PPE such as surgical masks may be worn for procedures with high probability for splashes, spray, splatter or droplets. Work in rooms with infected animals or high risk inhalation hazards (infectious to humans) may require respiratory protection. If respiratory protection if used voluntarily or as required PPE, the EHS department on the main campus of UTIA safety office on the Agricultural Campus must be contacted prior to voluntary or required use. The respective office will assist with selection, training, fit testing, and other requirements.
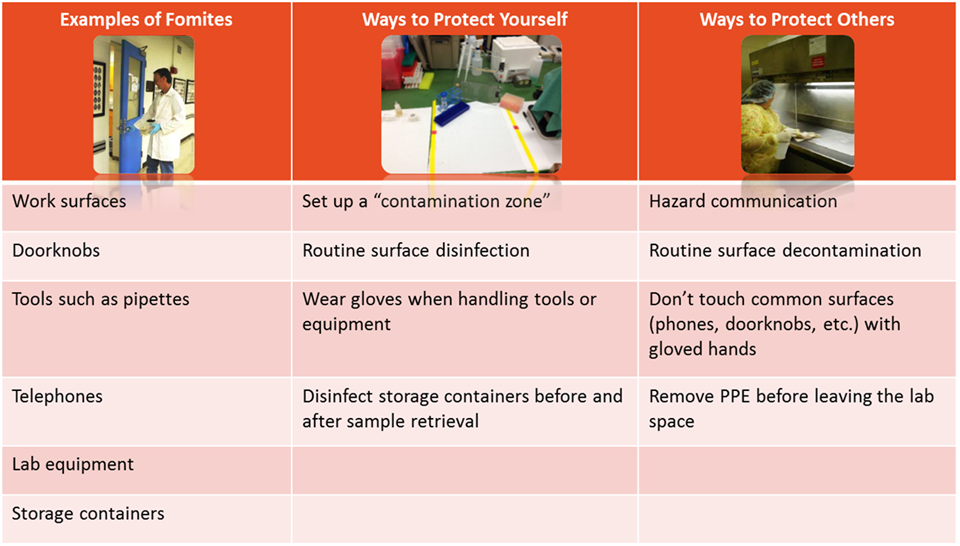
3.6 FOMITE TRANSMISSION
Besides direct contact with contaminated fluids, infectious agents may also be transmitted by fomites. Fomites are inanimate objects or materials that are likely to harbor and spread infectious agents through contact. Examples include: equipment, utensils, doorknobs, keyboards, furniture, PPE, and cell phones. Practices to minimize fomite transmission are outlined below:
3.7 AEROSOL RISK
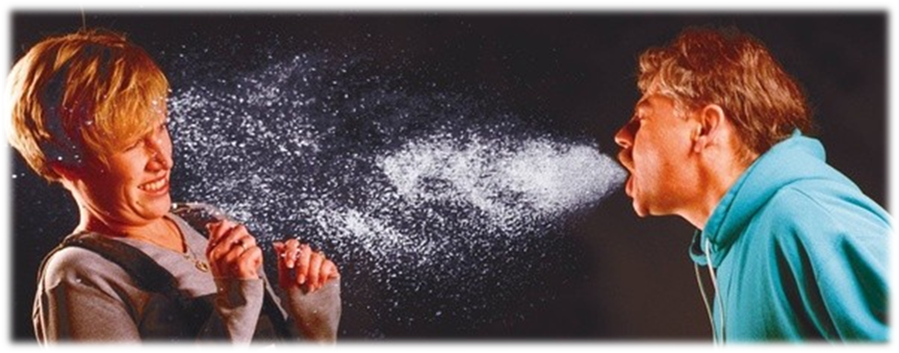
In 2012, the CDC estimated approximately 80% of laboratory acquired infections are caused by aerosols of pathogenic microorganisms. Laboratory personnel who work with agents infectious to humans must ask themselves:
1) Am I working with concentrated stocks?
2) Will my procedures concentrate the risk group 2 pathogens (e.g., high-speed centrifugation)?
3) Does my procedure generate aerosols?
Aerosols are solid or liquid particles suspended in the air (1-100 µm). The fate of these particles is determined by relative size:
Common laboratory procedures that may produce aerosols include:
Devices that have the potential to create aerosols:
Aerosol droplets are formed with virtually any activity that disrupts the surface tension of a liquid or applies mechanical force to a solid. As liquid particles bearing infectious agents may remain in the air for extended periods, it is important to consider methods of aerosol control.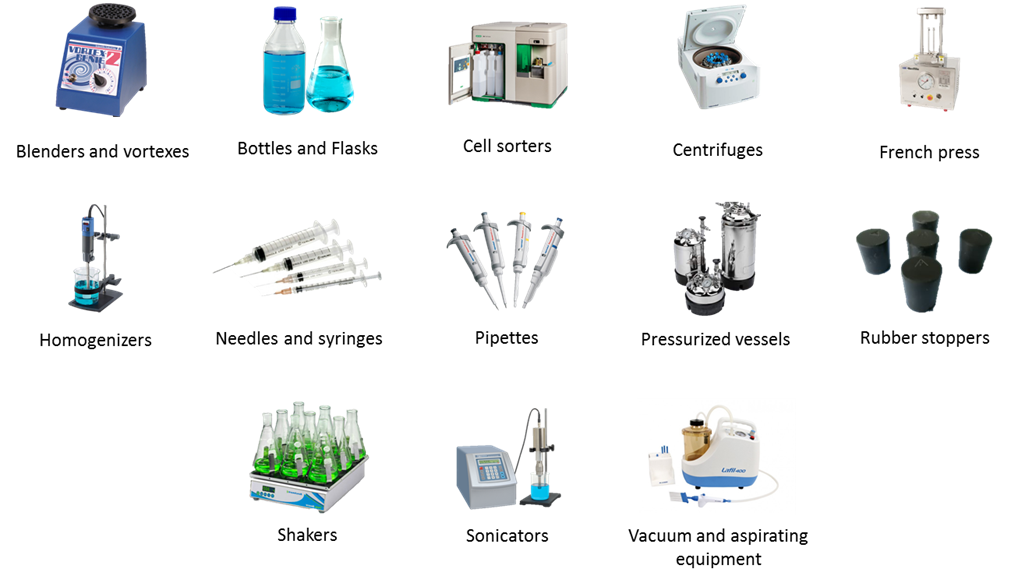
Using a combination of the appropriate safety equipment and safe procedures is the primary method to minimize the creation of and exposure to aerosols. Lab safety equipment to protect personnel from aerosols Safe work practices for centrifugation of biohazards Safe work practices for blending, sonicating, grinding, and lyophilizing of biohazards Safe work practices for pipetting of biohazards Other safety precautions
3.8 BIOLOGICAL SAFETY CABINETS (BSC)
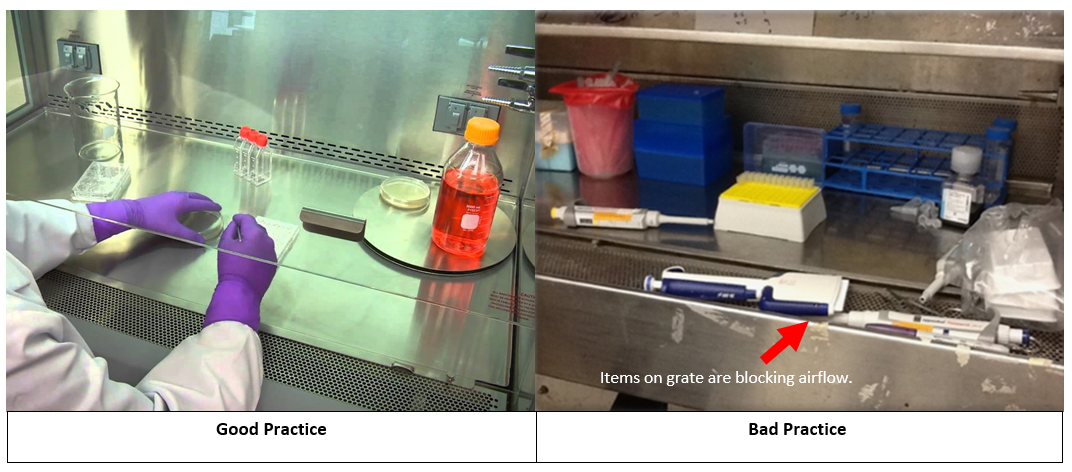
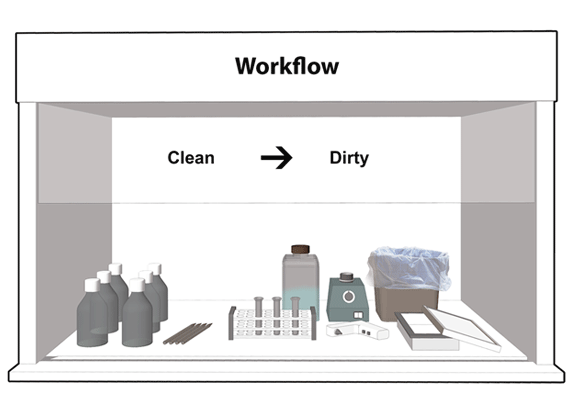
BSCs use HEPA (high-efficiency particulate air) filters to filter infectious particles from an airstream. BSCs may be used at BSL-1 to maintain an environment of sterility that is not achieved on the open bench. At BSL-2, the BSC is relied upon to protect the worker and the environment from procedures that are likely to generate aerosols. However, BSCs are only effective if used properly. This requires an understanding of how they function as well as proper technique. NOTE: BSCs remove particles, not vapors. Volatile hazardous chemicals are not to be used in a BSC unless approved by EHS Lab Safety Services.
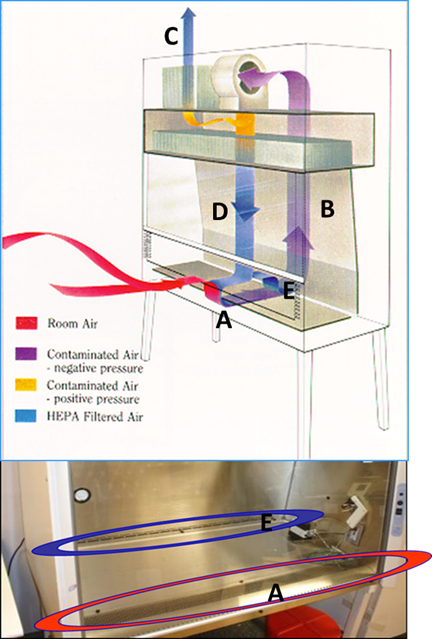 BSCs offer protection by drawing the air in at the face opening (A) and immediately drawing the air through the front grille and under the work surface. The air is then blown through the rear air plenum (B) to the top of the cabinet where it is divided into two chambers. Thirty percent of the air is exhausted out of the cabinet (C) through a high efficiency particulate air (HEPA) filter into the laboratory room. The remaining (70%) of the air is directed through another HEPA filter down onto the work surface (D) in a laminar flow directional air pattern. Air then splits to either the front grille or back grille (E). Most BSCs at UTK operate in this manner.
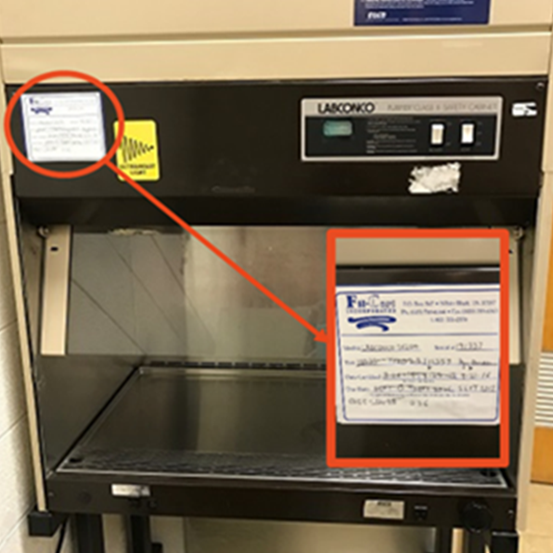
EHS Lab Safety Services requires that BSCs used for BSL-2 containment be certified: The certification verifies HEPA filter efficiency and calibration of the airflow that provided that protective inward airflow at the face of the cabinet. Certification is performed by a contracted field certifier in accordance with prescribed parameters. Once certified, the BSC will be tagged by the contractor as illustrated here. While biosafety cabinets are not required for worker protection in BSL-1 containment, if they are used, annual certification will help ensure that the intention of use is met, regardless of the operating biosafety level. If your BSC is due for certification, or if you need a list of approved field certifiers, contact EHS Lab Safety Services at 865-974-5084.


For additional resources on the care and use of BSCs, see:
The Laminar Flow Bench: The Chemical Fume Hood: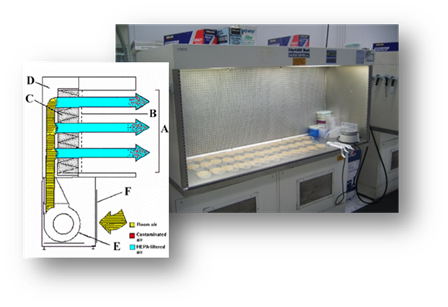
3.9 CENTRIFUGES
The centrifuge is a commonly used tool in laboratory research. It uses centrifugal force to separate substances in liquid or solid media according to particle size and density differences. Centrifugation may present two serious hazards: mechanical failure and dispersion of aerosols. Therefore, training on how to use the centrifuge properly and safely is essential for all new employees as part of Lab-Specific Training.
3.9.1.1 Before Centrifugation 3.9.1.2 During centrifugation 3.9.1.3 After centrifugation 3.9.1.4 Centrifuging Infectious Materials or Human Samples Follow the safety procedures above, plus:
3.9.2.1 Emergency Situations
The following events are considered an emergency:
- If there is a spill in the centrifuge
- If centrifuge malfunctions
- If there is a rotor failure
- If there is a tube breakage
3.9.2.2 Emergency Procedures
For emergencies with RG2 organisms or hazardous materials
- Turn centrifuge off immediately and keep centrifuge lid closed
- Notify others
- Evacuate the lab if necessary
- Close the lab door
- Post a biohazard spill sign at the lab door
- Leave for 30-minutes to reduce the risk of aerosols.
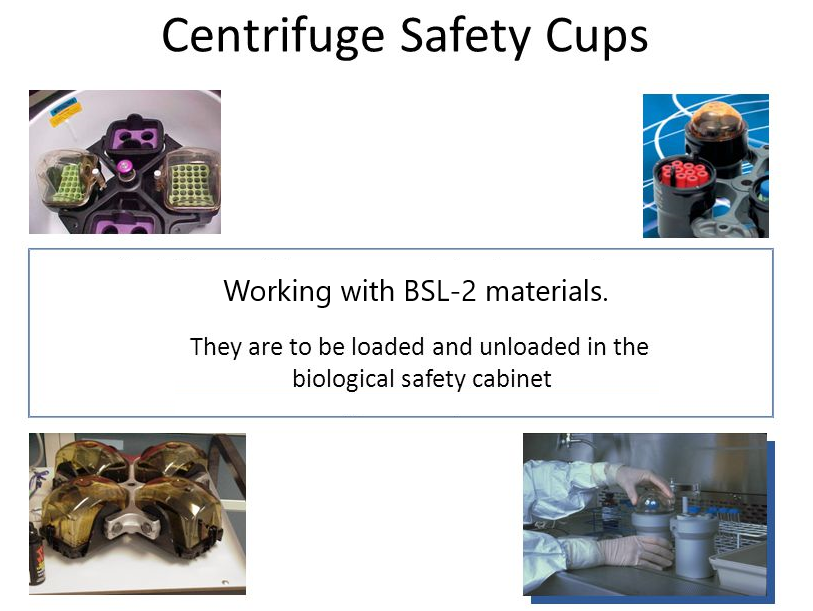
- For spill cleanup, the operator should wear proper PPE, remove debris, clean and disinfect centrifuge interior, rotors, safety cups or buckets following the manufacturer’s instructions
- Place any contaminated protective clothing, gloves, and all cleanup materials in a biohazard bag
- Wash hands and any exposed skin surfaces with soap and water
- Seek medical attention as necessary
- Report incidents to P.I. or lab supervisor and EHS if the incident involves chemical hazards. Call EHS Lab Safety Services at 865-974-5084 for assistance
3.10 DECONTAMINATION AND DISINFECTION
The university requires that all individuals that work in a laboratory are adequately informed about the chemical, physical, and health hazards present in the laboratory, the known risks, and what to do if an accident occurs.
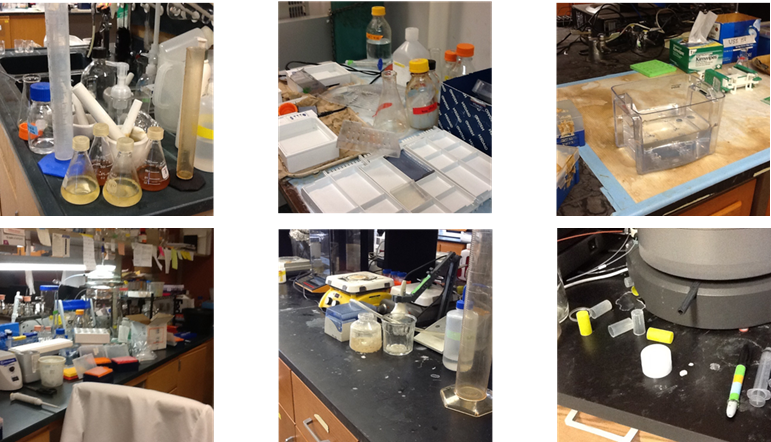
Proper approaches to disinfection and decontamination are important for the protection of lab personnel and for the prevention of environmental release of organisms. Removal of infectious agents by surface cleaning is a critical component of biological safety in the lab.
While the immediate work space is an obvious area requiring regular decontamination procedures, there remain other critical items which might not be as apparent.
- Outer surfaces of storage and sample containers
- Vortexes
- Centrifuges (housing and rotor)
- Outer & interior surfaces of incubators
- Interior surfaces of the BSC before & after procedures
- Common contact surfaces (doorknobs, keyboards, etc.)
- Any surface you may have touched with gloved hands
- When retrieving sample containers
- After removing from water baths
- Upon completion of procedures involving infectious agents
- Any time a spill occurs
- Is the product appropriate for the organisms that are being targeted?
- Is it safe for the given surface?
- Are there personal hazards to consider that would warrant the use of PPE? Remember that disinfectants typically work by targeting basic cellular structures/macromolecules (dissolve lipids, denature proteins, induce nucleic acid breaks, etc.). Our cells share this biology; thus, disinfectants can act as hazardous chemical. Depending on the type/class, these may cause skin/eye burns, sensitization of the skin (rashes) and/or respiratory tract (wheezing/asthmatic symptoms), or cancer (the aldehydes and ethylene oxide are recognized carcinogens).
- Are there special instructions for the preparation of the mixture?
- Does it need to be diluted?
- What is the minimum time it must be in contact with contaminated surfaces to reduce the infectious potential to acceptable levels (also called the contact time).
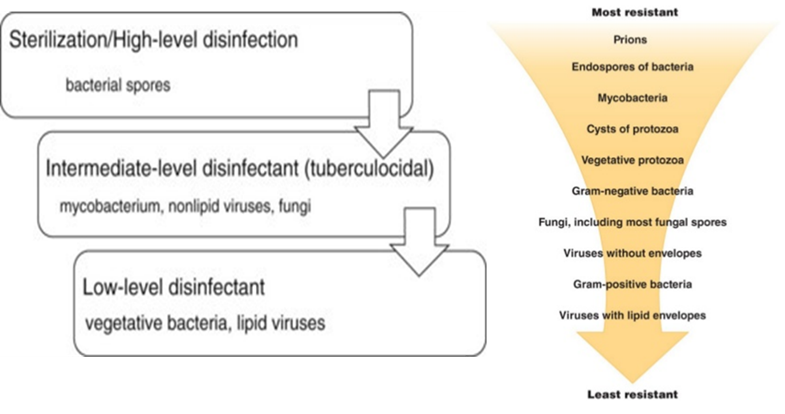
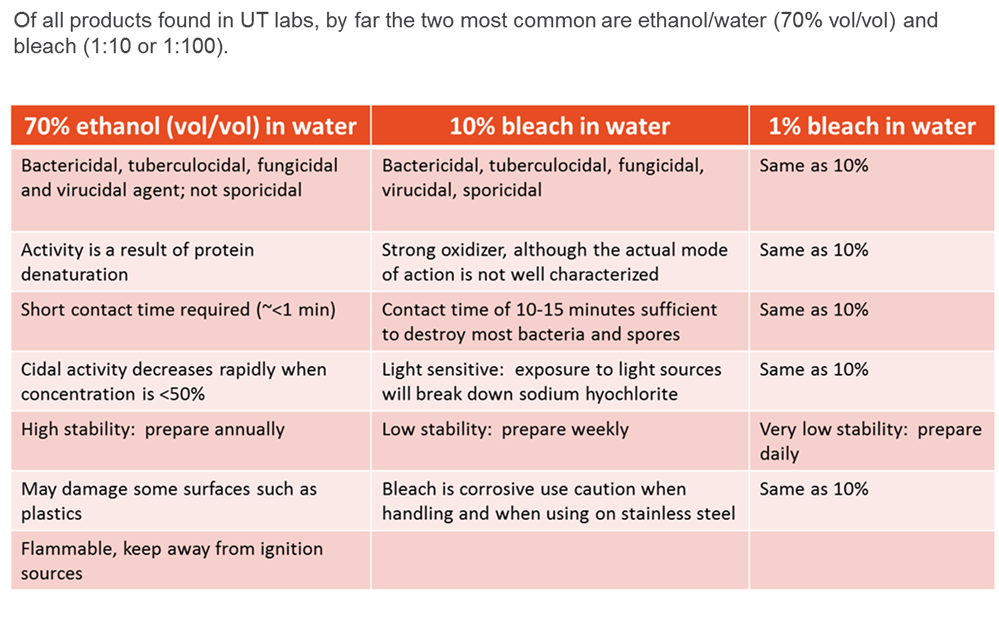
Currently, there are a wide variety of disinfectant options available. The products generally fall into the following categories (listed from low-level to high-level disinfectants):
- Quaternary Ammonium (Cavicide; Lysol)
- Ethyl and isopropyl alcohol
- Phenols (Clorox bleach-free, Vesphene)
- Chlorine compounds and hypochlorite/bleach (Clorox)
- Iodophors (Povidone-iodine solution)
- Aldehydes: Glutaraldehyde (Cidex); formaldehyde; paraformaldehyde
- Ethylene oxide
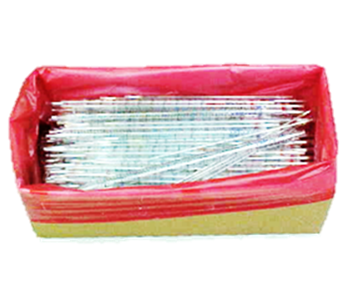
3.11 SHARPS MANAGEMENT
In the lab, a sharp refers to any object that is contaminated with a biologically hazardous agent and is sharp enough to puncture the skin without excessive applied pressure of force. While needles and scalpels could be considered the most apparent objects in this category, other items may also meet this definition.
Some examples include:
- Broken glassware
- Serological pipettes (especially if broken or damaged)
- Pasteur pipettes
- Metal edges
- Unpolished glass (slides and cover slips)
Penetration of the skin with a biologically contaminated sharp device is one of the most efficient means of transmitting infection.
In order to minimize the risk of a sharps injury the following guidelines must be followed:
- Use disposable sharps when possible and have a sharps container readily available within arm’s reach for disposal of sharps immediately after use (do not manipulate (recap) by hand before disposal).
- Needles must not be bent, sheared, broken, recapped, removed from disposable syringes, or otherwise manipulated by hand before disposal
- Do not pass a sharp to another person
- When cleaning and processing reusable sharps, use cleaning tools that limit the potential for contact between your hands and the sharp surface
- Don’t leave sharps unattended
- Do not leave sharp devices in your pockets
- Broken glassware is a risk of injury in BSL-1 labs and a risk of injury and infection in BSL-2 labs. It is prudent to substitute plastic for glass in BSL-2 labs whenever possible. If you have large biologically contaminated broken glass items, they must be treated as sharps. Always wear gloves and use tongs or a brush and dustpan to collect broken glassware. See the guidance for glass disposal in laboratories on the Facilities Services web page: http://fs.utk.edu/Units/facop/building-services/glass-disposal.html
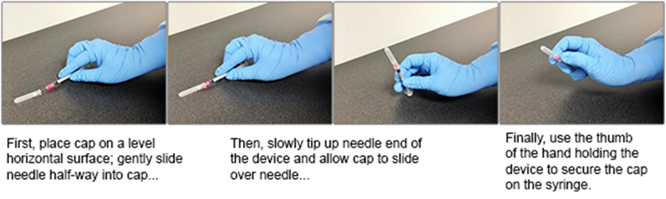
Needles are not to be recapped at BSL-2 unless specifically exempted by EHS. Needle recapping is discouraged at BSL-1, but if necessary, the one-handed scoop technique may be used.
If research activities create the need to recap needles, your lab should submit the needle re-capping exclusion form to EHS. In rare instances where re-capping is permissible, utilize the one-handed scoop method. First, place the cap in a flat surface. Second, using one hand, scoop the cap up with the needle. Third, using the same hand, “click” the cap in place by pressing with your thumb at the base of the needle cap.
3.12 BIOHAZARDOUS WASTE MANAGEMENT
INFECTIOUS WASTE COLLECTION, DISINFECTION, AND DISPOSAL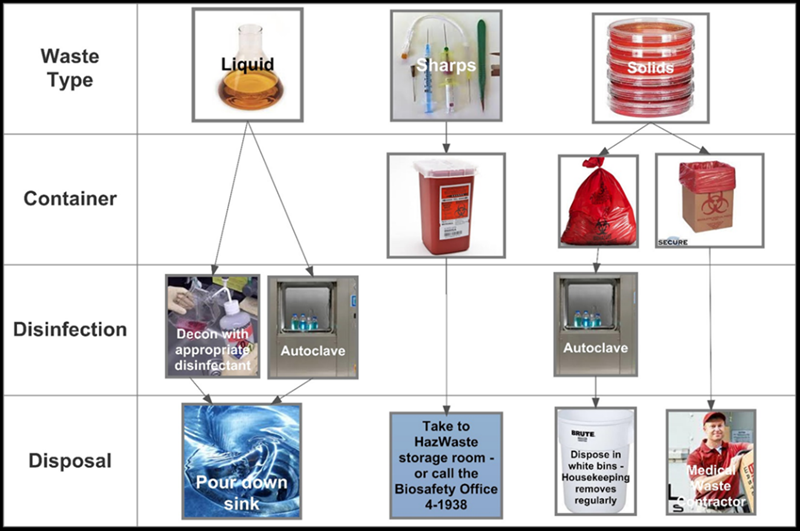
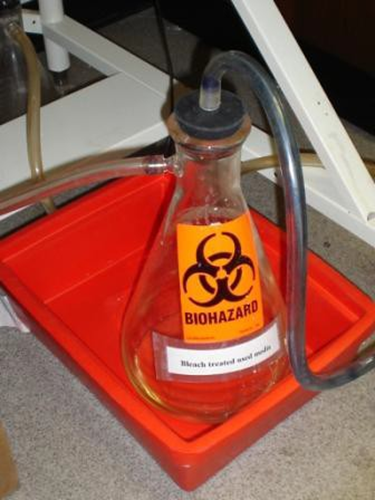
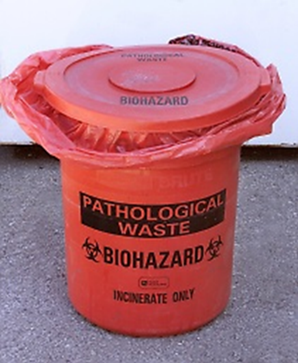
3.12.2.1 Liquids Liquid wastes may be treated and disposed of by either of the following methods: OR 3.12.2.2 Sharps Biohazardous sharps waste must be disposed in an FDA-approved container that is manufactured for the disposal of biohazardous sharps waste: 1) puncture resistant; 2) restricted opening disallowing retrieval of sharps; 3) a lid that can be securely closed once full; and 4) labeled with the universal biohazard symbol. Additionally: 3.12.2.3 Solids Treatment of solid, non-sharps biohazardous waste may occur in two ways: NOTE: If other methods of decontaminating and disposing of biohazardous waste are desired, validation data specific to the requested alternative method may be submitted to EHS for review. 3.12.2.4 Serological Pipettes Suggested practices: 3.12.2.5 Pathological Waste Pipette wastes may require creative approaches for accumulation prior to disposal. Serological pipettes and micropipette tips are good examples, as they may not fit some biohazardous waste bins or may present a sharps hazard if they comingle with heavier wastes (e.g., agar plates). Animal tissues, tissue trimmings, organs, or carcasses must be: NOTE: Never discard pathological wastes into the trash!
 ¾ full or whenever items do not freely fall into the container. Never pack, tamp, or shake a sharps container to fit additional items.
 Non-sharps solid biohazardous waste must be collected for final treatment and disposal in a leak-proof container lined with an autoclavable bag of moderate thickness to prevent punctures. The collection container must have a lid or other means of closure and the container must be labeled with the biohazard symbol regardless of the lab’s operating biosafety level. For BSL-2 labs, bags must be red, orange, or embossed with the biohazard symbol.
 Pipette wastes may require creative approaches for accumulation prior to disposal. Serological pipettes and micropipette tips are good examples, as they may not fit some biohazardous waste bins or may present a sharps hazard if they comingle with heavier wastes (e.g., agar plates).
 Any lab worker handling untreated biohazard waste must:
3.12.4.1 Autoclave Use and Safety: Validations In accordance with local and state regulations, all biohazardous waste must be biologically-inactivated before it is disposed of as trash. This can only be achieved if the waste is exposed to the right temperature for the right amount of time. Optimally, the waste should be exposed to: 121°C, at a pressure of 15 PSIG for at least 20 minutes. If you are an autoclave validation volunteer, employ the following autoclave validation practices: Note: biological indicators (Geobacillus stearothermophilus spore) testing may be required in some circumstances. Contact EHS for instructions. 3.12.4.2 Autoclave Use and Safety: Bagged Waste Employ the following autoclave treatment protocol for biohazardous waste: CAUTION: Do not autoclave wastes that are contaminated with hazardous chemicals or radiological materials!!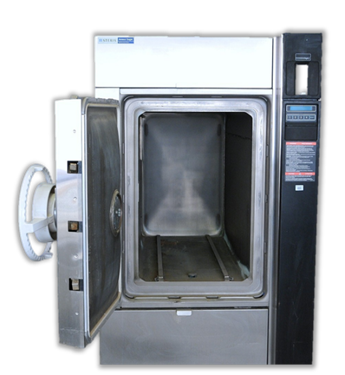 Autoclaves pose physical (e.g., heat, steam and pressure) and biological hazards. Each autoclave has unique characteristics and resulting hazards. Review and understand the owner’s manual before using any autoclave for the first time and as needed thereafter. Employ the following autoclave safety practices:

3.13 SPILL PREVENTION AND RESPONSE
Spills are a part of life in the laboratory and will occur. This means that when working with infectious or recombinant agents, precautions must be taken to reduce the number of spills and that a spill response plan must be in place.
Cleaning up a biohazardous spill in a biosafety cabinet
- Let the BSC run. Do not turn off.
- Remove broken glass with forceps, tweezers or other tools and place glass in a sharps container. Do not wipe up broken glass.
- Cover spill with paper towels.
- Pour (don’t spray) disinfectant to contaminated surface by pouring it around the periphery of the covered spill moving inward. Allow the appropriate contact time for the disinfectant and agent.
- After the contact time, wipe up the spilled material.
- Reapply disinfectant to the affected area and after the appropriate contact time, wipe up the area. Repeat if necessary.
- Perform disinfection before removing items.
- Segregate contaminated cleanup materials into the appropriate biohazardous waste containers.
Cleaning up a biohazardous spill outside of a biosafety cabinet
- Close off the area and allow aerosols to settle.
- Notify others including supervisor.
- Assemble all spill cleanup materials and review procedure.
- Don appropriate PPE: laboratory coat, safety glasses or chemical splash goggles (depending on risk of splashes), Nitrile gloves.
- Cover spill with paper towels.
- Pour (don’t spray) disinfectant to contaminated surface that is covered with paper towels by pouring it around the periphery of the spill area moving inward. Allow the appropriate contact time for the disinfectant and agent.
- Wipe up spill. Dispose of the waste in the biohazardous waste containers.
- Re-apply disinfectant to contaminated surface and allow it to stand for proper contact time.
- Wipe up disinfectant, repeat if necessary.
- Segregate contaminated cleanup materials into the appropriate biohazardous waste containers.
Cleaning up a biohazardous spill inside a centrifuge
- Close off the area and allow aerosols to settle.
- Notify others including supervisor.
- Wait 30 minutes to allow the aerosols to settle.
- Don appropriate PPE: laboratory coat, safety glasses and Nitrile gloves.
- Remove rotors and bucket and place in Biosafety Cabinet.
- Thoroughly disinfect the inside and outside of the centrifuge rotor, cups and accessories and allow proper contact time. After disinfection, move to sink for a thorough rinse, dry thoroughly.
- For the centrifuge interior, follow the steps above for cleaning up a spill outside a Biosafety Cabinet.
- Segregate contaminated cleanup materials into the appropriate biohazardous waste containers.
Note: The response outlined above refers to spills that are <500 mL. For larger spills, please contact EHS.
3.14 EMERGENCY RESPONSE AND NOTIFICATION
 Proper response to personal exposure is to flush the exposed area for a minimum of 15 minutes.
After initial first aid, report the incident to your supervisor and seek medical attention as soon as possible. The need for these steps can arise from an incident where (not an all-inclusive list):
- The skin is cut or punctured with a contaminated sharp
- Broken skin comes into contact with a hazardous or infectious material
- You experience a splash, splatter, or spray to the eyes, nose or mouth
- You suspect you have inhaled a material that is infectious to humans.
It is important to have pathogen/strain information for the materials you are working with available to carry with you when you seek medical attention.
To ensure proper agency reporting and other remedial actions, notify your supervisor and EHS in the event of:
- Accidental exposures to Risk Group 2 (or higher) organisms
- Accidental exposures to organisms containing recombinant or synthetic nucleic acids
- Accidental releases, discharges, or spills in public areas involving Risk Group 2 (or higher) organisms
- Accidental releases, discharges, or spills in public areas involving organisms containing recombinant or synthetic nucleic acids
- Discovery or diagnostic confirmation of a select agent or toxin
- Biohazardous materials appear to be tampered with or missing.
Emergency procedures, reporting, and medical evaluation are summarized below:
- For all infectious biological material and human derived material exposures, paid staff must report exposure to CorVel Corp. at 1-866-245-8588 to obtain a claim number per UT Risk Management procedures (this step can be concurrent with emergency reporting). Follow CorVel instructions for medical follow-up with health care provider. Paid employees must complete the Worker’s Compensation forms as soon as possible. Forms are to be remitted to the Risk Management Office. For additional information, see http://riskmanagement.tennessee.edu or contact (865) 974-5409.
- Unpaid students may report to UT Student Health Services (865-974-3135) or their primary care physician. Unpaid volunteers may report to the health care provider of their choice. Individuals not listed on the UT payroll may be personally responsible for medical costs. Unpaid employees must complete the Incident Report Form found at http://riskmanagement.tennessee.edu or contact (865) 974-5409.
In the event of a fire, follow the actions prescribed by UT fire policies. In the event of a fire in the BSC, turn the blower off and close the sash to minimize the immediate spread of the fire and follow the actions prescribed by UT fire policies. In the event of a building evacuation while you are working with materials at BSL-2, cover the materials or leave them in the BSC. Remove your gloves and lab coat on your way out of the lab.
Medical emergencies can only be responded to successfully if they’re reported. In many BSL-2 environments, the work may be done by one individual in a culture room or an isolated area of the lab where a person may not be readily visible. Therefore, anyone who will be working at BSL-2 should assure that at least one other person in the lab group knows that they will be working, and the person notified should check on them frequently to assure that they are alright. If a medical emergency arises for someone in your lab who is working with materials requiring BSL-2 containment, call EMS (by way of 911) immediately. While life safety is first and foremost, some basic actions should be taken to minimize the spread of contamination.
For injuries not related to an exposure event (i.e. back strain, paper cut, etc.) follow the regular occupational injury reporting process. In the event of biological exposure incident, follow the procedures outlined in Section 5 (Occupational Health) of the biosafety manual. Remember to flush the exposed skin or mucous membranes for 15 minutes, report it to your supervisor and EHS at 865-974-5084 and to seek medical attention.
All personnel experiencing an exposure to potentially infectious materials must also complete the Biosafety Incident Report form and submit the completed form to EHS. The form may be found at https://biosafety.utk.edu/emergency-response/, or by contacting EHS Lab Safety Services at 865-974-5084. After initial investigation and filling out the form, contact EHS for communication and follow-up. EHS encourages all lab personnel to report near miss events and unsafe conditions as well as exposures. Follow the exposure guidelines above for near misses and unsafe conditions or call EHS at 865-974-5084.